This post is the README for my home network and something I can refer to later. It’s the story of how I replaced a underperforming consumer-grade router with a fully virtualized RouterOS instance using QEMU and PCI passthrough for the network.
Like any software project, this project is source controlled and rebuildable from scratch. If the router dies, I simply deploy a new router instance. This is the reproducibility you’d expect in a datacenter, not a home office.
This guide will cover hardware planning, automating the installation process, and disaster recovery. Even if you’re not an operations person, you’ll have the tools to build and rebuild your network.
Why a Virtual Router?
Using a virtual router allows me to perform experiments or make basic changes against a test instance before taking down the Internet. I’ve written about these benefits before.
Hardware upgrades are simple as I’m not locked into a vendor’s hardware platform. Instead I can use a more powerful x86 CPU or faster network cards. I frequently find used 8th or 10th generation Intel CPUs on Ebay can be less expensive then purchasing the latest consumer grade router.
In my case, I noticed both VPN traffic and QoS performance were lagging with the MIPS based CPU inside my consumer router. It seemed like a great opportunity to put this virtual router idea into action as I had old desktop parts in storage.
Architecture & Planning
I upgraded from a MIPS based Mikrotik Hex-S by migrating to a PC built with old parts. The CPU is a 7th Gen (2017) Intel Celeron (G3930), with 4GB of memory, and a 1GB SSD. I wanted additional network ports and purchased a dual 1Gb Intel network card (I350) for $27 on Ebay. None of these parts would be considered high-end today.
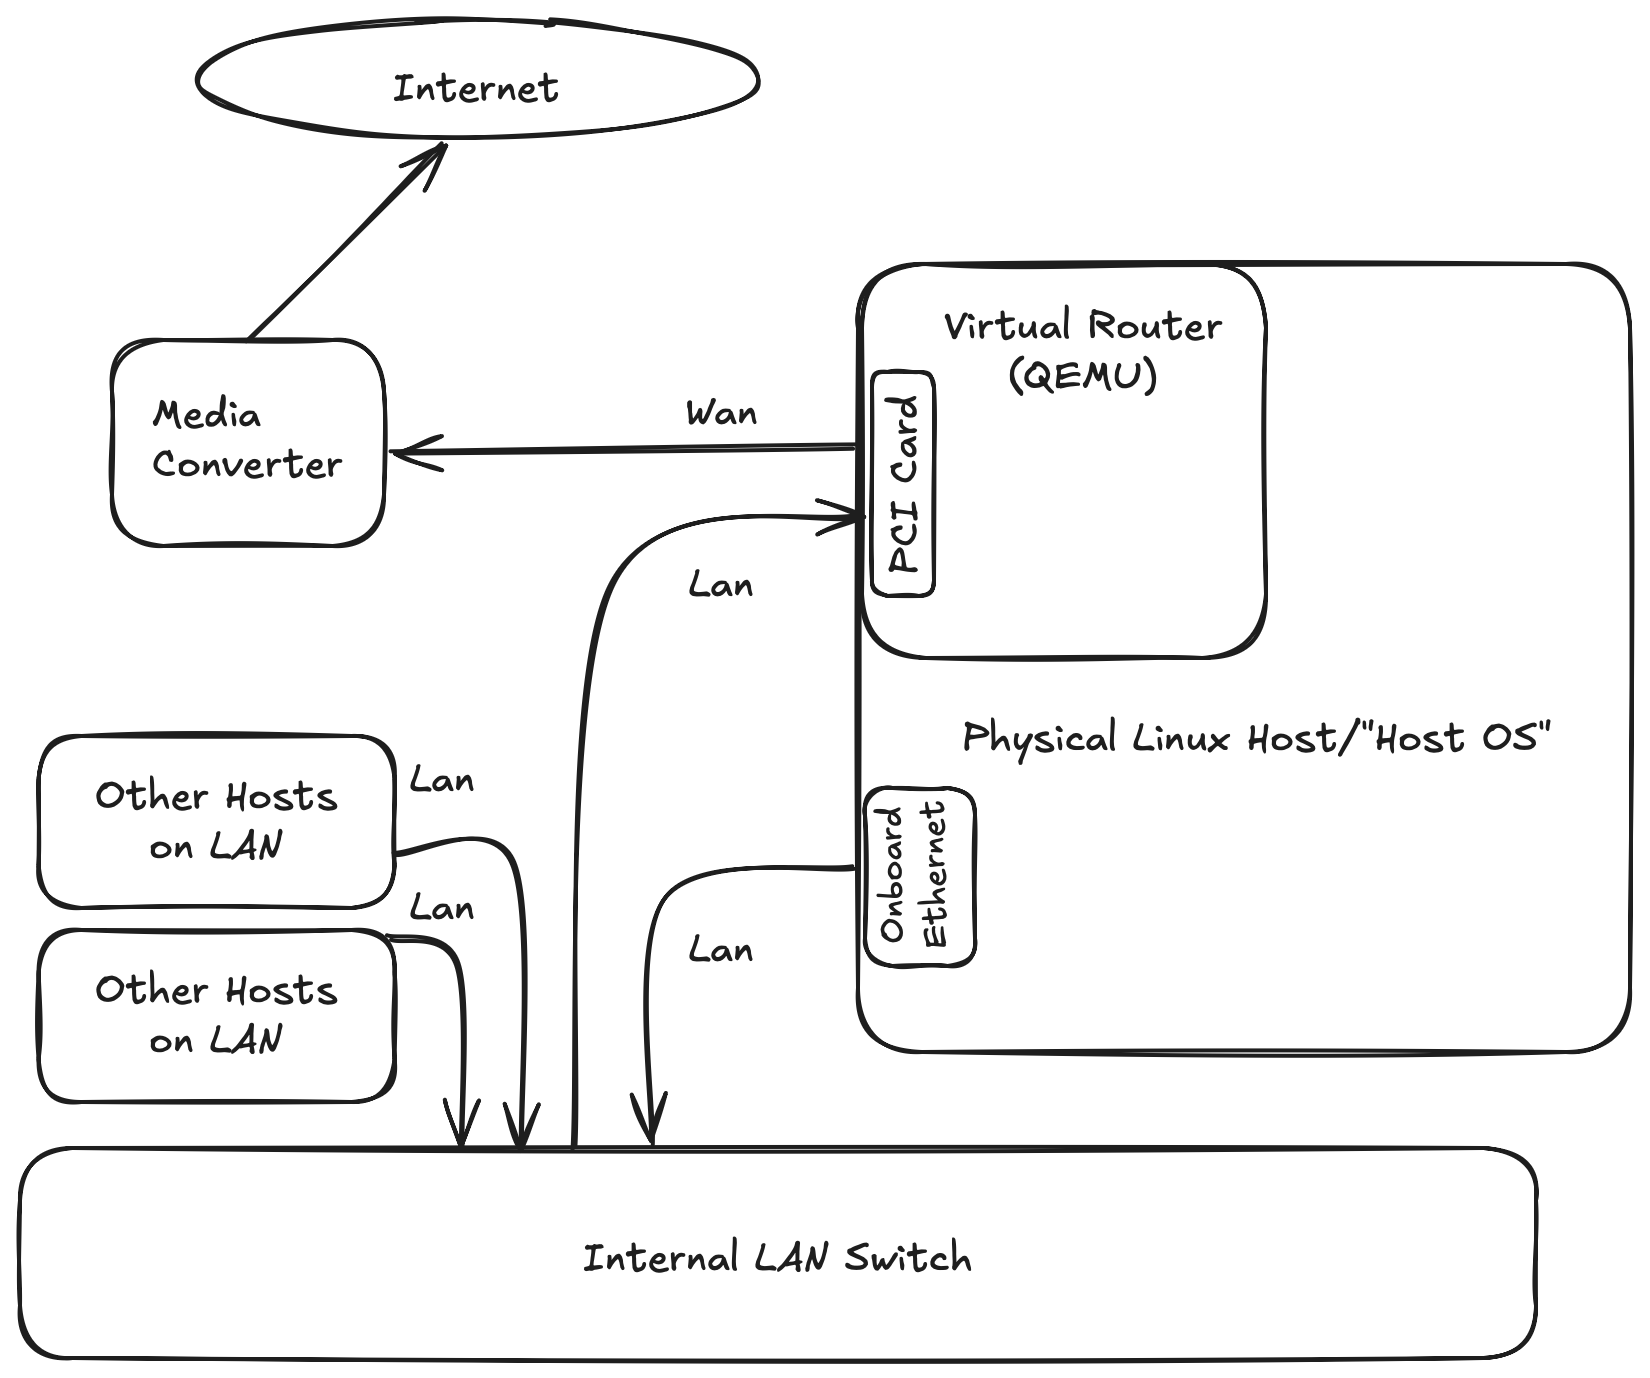
In this wiring diagram, you’ll see the virtual router has the dual port PCI card assigned to it. The host OS is using only the onboard ethernet controller for connectivity. This allows me to isolate the dual port PCI card from the host OS, ensuring host OS traffic going to the Internet is passing through the switch and then the PCI card assigned to the router. There are no network shortcuts which could allow the host OS to bypass the virtual router.
The media converter is something like a DOCIS cable modem or a copper to fiber converter.
For controlling the VM itself, I’m using QEMU commands (with KVM extensions) inside a Systemd Unit file. Of course there are abstractions like libvirt which wrap QEMU, but it felt unnecessary for this simple use case. Invoking QEMU directly also provides a learning opportunity to understand what’s being abstracted.
Preparing the Host
I started by assembling my PC parts into a working desktop computer and installed Ubuntu server image 25.10 as the host OS. Make sure the qemu-utils and qemu-system-x86 packages are installed. I wanted a service account to run the virtual router process. I created a user named qemu and gave it access to the kvm group.
If doing this by hand:
sudo useradd -r -s /usr/sbin/nologin qemu
sudo usermod -aG kvm qemu
Isolating Network Cards
This step is generic to isolating PCI cards for any type of virtual machine. The first step is to get the PCI ID tuple that’s burned into the card’s firmware.
$ lspci -nn | grep Ethernet
01:00.0 Ethernet controller [0200]: Intel Corporation I350 Gigabit Network Connection [8086:1521] (rev 01)
01:00.1 Ethernet controller [0200]: Intel Corporation I350 Gigabit Network Connection [8086:1521] (rev 01)
06:00.0 Ethernet controller [0200]: Realtek Semiconductor Co., Ltd. RTL8111/8168/8211/8411 PCI Express Gigabit Ethernet Controller [10ec:8168] (rev 0c)
The first column shows the card location on the PCI bus. We’ll need those values later but not now. The numbers we are interested in are the “8086:1521” tuple. The first value (8086) in the tuple is registered to Intel, the second value is the cards model number which maps to the i350 family of network controllers.
Because I want to assign the Intel network card to the router VM, I first need to denylist the IGB driver to prevent the host OS from using it.
echo "blacklist igb" | sudo tee /etc/modprobe.d/blacklist-igb.conf
sudo update-initramfs -u
Next I need to load the vfio-pci module at boot time so the network card can be assigned to the VM.
echo 'GRUB_CMDLINE_LINUX_DEFAULT="$GRUB_CMDLINE_LINUX intel_iommu=on vfio-pci.ids=8086:1521"' | sudo tee /etc/default/grub.d/virtualRouterNic.cfg
sudo update-grub
sudo reboot
Now the steps I listed aren’t ideal for everyone but they work for me. Deny listing the IGB kernel module impacts all Intel network cards needing that driver. My motherboard has a Realtek NIC and I have a single Intel PCI network card that’s assigned to the router VM, so this approach works for me.
But let’s pretend that instead, the motherboard has a Intel NIC that also uses the IGB kernel module. The listed steps would prevent the host OS from using the network adaptor that’s on the motherboard because we globally deny listed the IGB driver. If this was the case, I’d purchase a second PCI network card that didn’t use the IGB kernel module and use that for the host OS. It’s something to plan for when selecting hardware for this project.
Finally, I need to create a few udev rules. udev is responsible for detecting new hardware being plugged in and using custom rules can modify behavior during hardware detection. The qemu user, a member of the kvm group, is running the router VM process and normally doesn’t have write access to the Intel network card being assigned to the router VM. The updated udev rules will grant the kvm group members write permissions to the vfio device.
$ sudo vi /etc/udev/rules.d/99-qemu-vfio.rules
KERNEL=="vfio", GROUP="kvm", MODE="0660"
KERNEL=="[0-9]*", SUBSYSTEM=="vfio", GROUP="kvm", MODE="0660"
KERNEL=="kvm", GROUP="kvm", MODE="0660"
Reload the udev rules with:
sudo udevadm control --reload-rules
sudo udevadm trigger --action=add /dev/vfio/1
Then validate that members of the kvm group can write to the vfio device.
$ id qemu
uid=999(qemu) gid=987(qemu) groups=987(qemu),993(kvm)

$ ls -l /dev/vfio/
total 0
crw-rw---- 1 root kvm  241,   0 Aug 11 19:23 1
drwxr-xr-x 2 root root       80 Aug 11 19:23 devices
crw-rw---- 1 root kvm   10, 196 Aug 11 19:23 vfio
Network Time Protocol
Due to clock drift on virtual machines, ensure a time service like NTP is enabled on both the host and within the virtual router.
Documentation for the host OS will explain how this is enabled. For example, Ubuntu previsouly used systemd-timesyncd but later switched to the chrony package with Ubuntu 25.10. Similarly, the router software should include a NTP client so check it’s documentation as well.
Routing software
Mikrotik has a virtual machine image and being familiar with their command line, it seemed like a good place for me to start. I was asked in a Bluesky thread on why I use a Mikrotik VM when a basic Linux VM with traffic-control (tc) can act as a router. I responded by stating that I agree, but familarity with the Mikrotik CLI won out. A second bonus is should this virtualized router not work out, I can always go back to the Mips based Hex-S router I previously used.
Other platforms like OpenWRT or OpnSense also have x86 virtual machine images available and would work for this project.
I ended up using the stable 7.x release of Mikrotik’s CHR (Cloud Hosted Router) product and downloaded the raw image which I later converted into a qcow2 image that allows taking snapshots. Network card drivers included with CHR are the default drivers from the Linux kernel and a few others. Here’s a partial module list from one of Mikrotik’s change log entries (v7.12).
x86 - added support for Mellanox ConnectX-6 Dx NIC;
 *) x86 - i40e updated driver to 2.23.17 version;
 *) x86 - igb updated driver to 5.14.16 version;
 *) x86 - igbvf updated driver from in-tree Linux kernel;
 *) x86 - igc updated driver to 5.10.194 version;
 *) x86 - ixgbe updated driver to 5.19.6 version;
 *) x86 - Realtek r8169 updated driver;
Configuring the router itself is out of scope for this document, but this is the high level overview. The router configuration
is a text file I keep in git. The file format is fairly simple with each line having a RouterOS command. During
initialization, I can upload the text file to the router and have the router execute all the commands in the text file.
The config file can be checked into git and used as the source of truth.
One consideration with text based configs is managing secrets, which is covered in the next section.
Secrets
With the plain text router config file being checked into git, how are secrets handled?
I’m a fan of using 1Password for managing secrets and this is why. 1Password provides a CLI which reads vault secrets and is able to inject them into templates or environment variables. Additionally if a reference in the template file is missing from the vault, the CLI will fail to generate any output. This prevents generating router configs with incomplete or missing commands.
Here’s an example where I declare a secret reference in a file called router_config.tmpl. I then use the op command to generate a new file containing plain-text secrets named router_config.rsc. router_config.rsc is what’s uploaded to the router.
$ cat router_config.templ
/user set [find name=admin] password={{ op://API_Vault/Test_Login/password }}

$ op inject -i router_config.templ -o router_config.rsc
/Users/adam/work/public/amf3.github.io/router_config.rsc

$ cat router_config.rsc
/user set [find name=admin] password=my_secret_password
A .gitignore entry prevents me from commiting the router_config.rsc file with plain text secrets into git. I still have to remember to delete the .rsc file so it’s not perfect. But the process is simple and it works.
Qemu and Systemd
Because CHR is distributed as a virtual disk image, there’s nothing to install. Treat it like a OS disk when invoking QEMU.
These are the qemu options I use when starting the router VM.
- -machine q35 emulates a newer southbridge chipset for better PCI support.
- -device entries specify the Intel PCI card bus ID. If the card were moved to a different motherboard slot, those values would need to be updated.
- -serial and -monitor options create sockets to the VM’s and QEMU’s console that I can access with socat.
$ /usr/bin/qemu-system-x86_64 \
    -machine q35,accel=kvm \
    -cpu host -smp cpus=2 \
    -m 512M -boot c \
    -nic none \
    -drive file=/srv/virtual_machines/routeros/chr-7.19.3.qcow2,if=virtio,format=qcow2 \
    -serial unix:/srv/virtual_machines/routeros/console.sock,server,nowait \
    -monitor unix:/srv/virtual_machines/routeros/monitor.sock,server,nowait \
    -display none -vga none \
    -device vfio-pci,host=01:00.0 \
    -device vfio-pci,host=01:00.1
And the socat command to access the VM console or QEMU monitor.
sudo -u qemu socat STDIO,cfmakeraw,isig=1 UNIX:/srv/virtual_machines/routeros/console.sock
To ensure the router is automatically started on reboots, I wrapped the qemu command inside a systemd service unit named routeros.service.
[Unit]
Description=RouterOS VM (QEMU)
After=network-online.target
Wants=network-online.target
StartLimitIntervalSec=60
StartLimitBurst=5

[Service]
# Run as unprivileged user/group
User=qemu
Group=kvm

# Resources / limits
LimitMEMLOCK=infinity
LimitNOFILE=1048576
OOMScoreAdjust=-1000

# Set CAP_SYS_NICE for qemu process.
CapabilityBoundingSet=CAP_SYS_NICE
AmbientCapabilities=CAP_SYS_NICE

# Keep the rest of the system protected; allow explicit VM path writable
ProtectSystem=strict
ReadWritePaths=/srv/virtual_machines/routeros
ProtectHome=yes
PrivateTmp=yes

# Allow QEMU process to gain capabilities from AmbientCapabilities above
NoNewPrivileges=no

# Execution: adjust memory/cpu/paths/PCI IDs to your environment
ExecStart=/usr/bin/qemu-system-x86_64 \
  -machine q35,accel=kvm \
  -cpu host -smp cpus=2 \
  -m 512M -boot c \
  -nic none \
  -drive file=/srv/virtual_machines/routeros/chr-7.19.3.qcow2,if=virtio,format=qcow2 \
  -serial unix:/srv/virtual_machines/routeros/console.sock,server,nowait \
  -monitor unix:/srv/virtual_machines/routeros/monitor.sock,server,nowait \
  -display none -vga none \
  -device vfio-pci,host=01:00.0 \
  -device vfio-pci,host=01:00.1

# After process starts, restrict access to console and monitor sockets via filesystem permissions
ExecStartPost=/bin/sh -c 'while [ ! -S /srv/virtual_machines/routeros/monitor.sock ]; do sleep 0.5; done; chmod 600 /srv/virtual_machines/routeros/*.sock'

# Attempt a graceful shutdown by sending a powerdown event to the QEMU monitor.
ExecStop=/bin/sh -c 'echo "system_powerdown" | socat - UNIX-CONNECT:/srv/virtual_machines/routeros/monitor.sock || true'
TimeoutStopSec=120
KillMode=mixed

Restart=on-failure
RestartSec=5

[Install]
WantedBy=multi-user.target
Don’t forget to refresh systemd to pick up the changes before issuing enable or restart commands for the new service.
sudo systemctl daemon-reload
Maintenance and Recovery
Monitoring/Alerting
I keep alerting for the router uncomplicated. If the Internet stops working, I know there’s a problem.
This decision is partly due to a alerting design issue. If the Internet is down, local services are unable to post events to Slack channels which is how my phone receives alerts.
For a home network, user reports works well enough.
General Maintenance
Maintenance on the host OS means possible downtime for the router if a reboot is required. Conceptually this is no different from a consumer router appliance. Download and apply the updates, reboot the host when network usage is low. When possible, I test updates to router configs in a virtual machine using QEMU. The router only cares about interfaces being available, not that it’s using a vfio device.
When configuring the router software, I use a config file instead of making changes in the web UI. Using a config file allows me to track changes in a git repo. Mikrotik uses a script-like text file format where CLI commands are applied as the file is processed. This example shows how the external interface receives a DHCP address from my Internet provider while defining a RFC 1918 address for internal use on a second interface.
/ip dhcp-client add comment=admin_interface disabled=no interface=ether1  use-peer-dns=yes
/ip address add address=192.168.10.1/24 interface=ether2 network=192.168.10.0
The file is transferred to the router’s local filesystem by either using the web interface to upload the file or scp. Once stored on the router, I issue a router reset command that wipes all settings and reapplies the configuration.
/system/reset-configuration keep-users=no no-defaults=yes skip-backup=yes run-after-reset=router_config.rsc
Other routing projects offer similar features. OpenWRT supports text based configs with it’s Unified Configuration Interface API and Opnsense can be configured with it’s config.xml file. Meaning this approach isn’t limited to Mikrotik software.
Router Recovery
The virtual router is using a QCOW2 formated file as a virtual disk. This allows one to create restore points by taking point-in-time snapshots of content on the disk before making changes to the router.
To take a snapshot with the qemu-img command, stop the virtual router by issuing a shutdown command with systemd,
systemctl stop routeros.service. This is needed so qemu-img can get a write lock on the qcow2 file.
Next, to create a snapshot within the qcow2 file, run qemu-img snapshot -c mySnapshotLabel /path/to/routeros.qcow2. The label
“mySnapshotLabel” should be unique and meaningful so it can be located later.
Finally start the virtual machine with systemd and continue with patching the router OS or updating it’s configurations.
If an error occurs during or after router maintenance, stop the virtual router and apply the most recent snapshot in the qcow2 image to revert the change.
Use qemu-img snapshot -l /path/to/routeros.qcow2 to view existing snapshots. Then apply the snapshot with
qemu-img snapshot -a myGoodSnapshot /path/to/router.qcow2. When the old snapshot is applied, start the router to resume
services.
Sometimes when performing maintenance and while the router VM is stopped, I copy the qcow2 file to a local NAS to have a second copy in case of a disk failure.
Host OS Recovery
Things get more complicated if the host OS fails. You need to know what PCI ids are used by which cards and this is why I’m approaching this article from manual configuration. It would be simple to point to an Ansible repo specific to my setup, but that doesn’t help the reader.
Also Ansible needs a working system to apply changes. Because a rebuild implies installing the OS on new hardware, cloud-init is my preferred method to automate recovery.
Once the host OS is configured, I can copy the qcow2 image from my NAS and apply my text based router config to the new virtual router instance. While the process isn’t fully automated, it’s simple and reproducible. While I haven’t needed to do a full host rebuild, the process has been tested in VMs.
It’s important to remember that the internet is unavailable during this time, so having a local copy of host OS ISO’s or router images is important.
Lessons Learned
I was expecting to hit performance issues due to old CPU and limited RAM. After several of months of use, the virtual router has been a success. It’s a stable service and VPN connections are much more performant.
Whether this is something someone should try themselves is debateable. While the setup is more complicated there are benefits of doing this. Getting faster router hardware or possibly repairing failed hardware with spare on-site commodity components.
For future upgrades, I’m going to explore using newer generation CPUs. The idle power consumption on 12th generation Intel CPUs is significantly less than the 17-20 watts my 7th generation Celeron system is currently using. A 12th gen i5 desktop I borrowed, went as low as 3-5 watts during idle. My eventual power goal is to get consumption under 10 watts.
If you try this approach and have questions, feel free to reach out on Bluesky social. Otherwise, let me know how it worked.